





Stop losing your outputs to session timeouts or network loss.
Your cells run on the server, so a reload, a closed laptop or a dropped connection no longer costs you an execution — and the outputs are still there when you come back.
📖 Documentation · 🔀 Output reconciliation · 💬 Community
- ⚡ Durable execution — a cell keeps running with no browser connected to it.
- 🖥️ Terminal-faithful outputs — progress bars overwrite their line, as they should.
- 🤖 Agent ready — a REST API to run cells and read outputs, so an agent works from the same Notebook you do.

Your agent can now reach these Notebooks without running anything. The Managed
Jupyter MCP Server, operated by Datalayer, is at https://mcp.datalayer.run/mcp — durable execution included, so a cell keeps running after the agent disconnects.

Claude Code connects with one command through the Datalayer plugin.
→ Datalayer plugin for Claude Code
Free and open source, BSD 3-Clause — install it in your own Jupyter, no account needed. Built and maintained by Datalayer, where the same durable execution powers always-on Notebooks that humans and AI agents work in together.


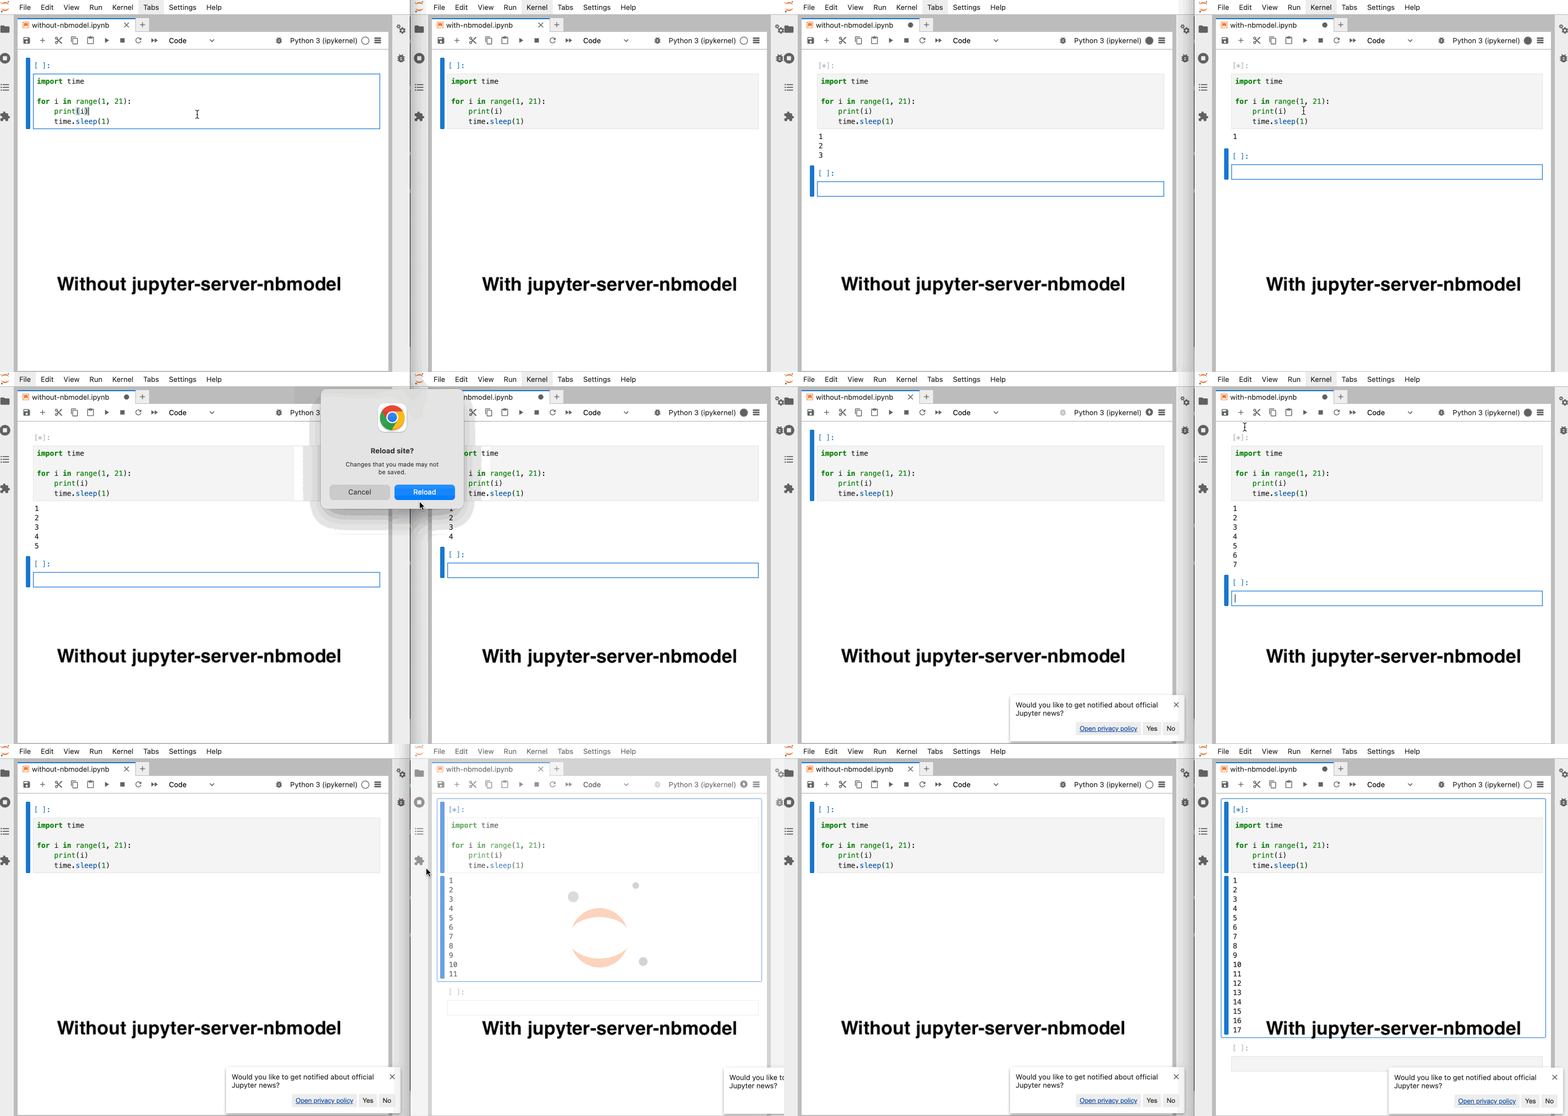
Side-by-side comparison: Without jupyter_server_nbmodel (left), notebook execution stops when reloading the page; with jupyter_server_nbmodel (right), execution continues uninterrupted even after reload.
A Jupyter Server extension to execute code from the server-side Nbmodel to keep your sessions and outputs active.
This extension is composed of a Python package named jupyter_server_nbmodel
for the server extension and a NPM package named @datalayer/jupyter-server-nbmodel
for the frontend extension. After installing the extension, run the snippet below in JupyterLab to try it.
import time

for i in range(1, 1000):
    print(i)
    time.sleep(1)
Streaming outputs also work with tqdm, whose progress bar overwrites its line
instead of printing one line per update.
from tqdm import tqdm  # Standard tqdm, not tqdm.notebook
import time

for i in tqdm(range(100)):
time.sleep(0.1) # Simulate long-running process- Jupyter Server
>=2.0.1,<3. - JupyterLab or Jupyter Notebook 7.
- Optional but recommended for full live output sync in the document UI: real-time collaboration in JupyterLab/Notebook.
To install the extension for use in JupyterLab or Notebook 7, execute:
pip install "jupyter_server_nbmodel[lab]"For API-only use:
pip install jupyter_server_nbmodelTo remove the extension, execute:
pip uninstall jupyter_server_nbmodelIf you are seeing the frontend extension, but it is not working, check that the server extension is enabled:
jupyter server extension listIf the server extension is installed and enabled, but you are not seeing the frontend extension, check the frontend extension is installed:
jupyter labextension list
Outputs are saved by the server and never appear in the notebook: the collaborative history of that document carries updates the browser cannot integrate.
Reconciliation explains what was
found, what writes the outputs in each mode, and the outputRecovery setting that works around it.
Execution of a Python code snippet: print("hello")
sequenceDiagram
    actor Frontend; participant Shared Document; actor Server; participant ExecutionStack; actor Kernel
    Frontend->>Shared Document: [*] busy
    Frontend->>+Server: POST /api/kernels/<id>/execute
    Server->>+ExecutionStack: put() request into queue
    ExecutionStack->>Kernel: Execute request msg
    activate Kernel
    ExecutionStack-->>Server: Task uid
    Server-->>-Frontend: Returns task uid
    loop Running
        Kernel->>Server: stream / display_data / execute_result / error msg
        Server->>Shared Document: Add output
        Shared Document->>Frontend: Document update
    end
    loop While status is 202
        Frontend->>+Server: GET /api/kernels/<id>/requests/<uid>
        Server->>ExecutionStack: get() task result
        ExecutionStack-->>Server: outputs accumulated so far
        Server-->>-Frontend: Request status 202 & outputs snapshot
        Frontend->>Shared Document: Reconcile missing output updates
    end
    Kernel-->>Server: Execution reply
    Server->>Shared Document: [𝒏] idle
    Server-->>ExecutionStack: execution_count, status, outputs
    Shared Document->>Frontend: [𝒏] idle
    deactivate Kernel
    Frontend->>+Server: GET /api/kernels/<id>/requests/<uid>
    Server->>ExecutionStack: get() task result
    ExecutionStack-->>Server: execution_count, status, outputs
    Server-->>-Frontend: Status 200 & { execution_count, status, outputs }
Execution of a Python code snippet: input("Age:")
sequenceDiagram
    actor Frontend; participant Shared Document; actor Server; participant ExecutionStack; actor Kernel
    Frontend->>Shared Document: [*] busy
    Frontend->>+Server: POST /api/kernels/<id>/execute
    Server->>+ExecutionStack: put() request into queue
    ExecutionStack->>Kernel: Execute request msg
    activate Kernel
    ExecutionStack-->>Server: Task uid
    Server-->>-Frontend: Returns task uid
    loop Running
        Kernel->>Server: stream / display_data / execute_result / error msg
        Server->>Shared Document: Add output
        Shared Document->>Frontend: Document update
    end
    loop While status is 202
        Frontend->>+Server: GET /api/kernels/<id>/requests/<uid>
        Server->>ExecutionStack: get() task result
        ExecutionStack-->>Server: null
        Server-->>-Frontend: Request status 202
    end
    Kernel->>ExecutionStack: Set pending input
    Frontend->>+Server: GET /api/kernels/<id>/requests/<uid>
    Server->>ExecutionStack: get() task result
    ExecutionStack-->>Server: Pending input
    Server-->>-Frontend: Status 300 & Pending input
    Frontend->>+Server: POST /api/kernels/<id>/input
    Server->>Kernel: Send input msg
    Server-->>-Frontend: Returns
    loop While status is 202
        Frontend->>+Server: GET /api/kernels/<id>/requests/<uid>
        Server->>ExecutionStack: get() task result
        ExecutionStack-->>Server: null
        Server-->>-Frontend: Request status 202
    end
    Kernel-->>Server: Execution reply
    Server->>Shared Document: [𝒏] idle
    Server-->>ExecutionStack: execution_count, status, outputs
    Shared Document->>Frontend: [𝒏] idle
    deactivate Kernel
    Frontend->>+Server: GET /api/kernels/<id>/requests/<uid>
    Server->>ExecutionStack: get() task result
    ExecutionStack-->>Server: execution_count, status, outputs
    Server-->>-Frontend: Status 200 & { execution_count, status, outputs }

The code snippet is always sent in the body of the POST /api/kernels/<id>/execute
request to avoid document model discrepancy; the document on the backend is only
eventually identical with the frontends (document updates are not instantaneous).
The ExecutionStack maintains an execution queue per kernel to ensure execution
order.
Note: You will need NodeJS to build the extension package.
The jlpm command is JupyterLab's pinned version of
yarn that is installed with JupyterLab. You may use
yarn or npm in lieu of jlpm below.
# Clone the repo to your local environment
# Change directory to the jupyter_server_nbmodel directory
# Install package in development mode
pip install -e ".[test]"
# Link your development version of the extension with JupyterLab
jupyter labextension develop . --overwrite
# Server extension must be manually installed in develop mode
jupyter server extension enable jupyter_server_nbmodel
# Rebuild extension Typescript source after making changes
jlpm build
You can watch the source directory and run JupyterLab at the same time in different terminals to watch for changes in the extension's source and automatically rebuild the extension.
# Watch the source directory in one terminal, automatically rebuilding when needed
jlpm watch
# Run JupyterLab in another terminal
jupyter lab --autoreload
With the watch command running, every saved change will immediately be built locally and available in your running JupyterLab. Refresh JupyterLab to load the change in your browser (you may need to wait several seconds for the extension to be rebuilt).
By default, the jlpm build command generates the source maps for this extension to make it easier to debug using the browser dev tools. To also generate source maps for the JupyterLab core extensions, you can run the following command:
jupyter lab build --minimize=False# Server extension must be manually disabled in develop mode
jupyter server extension disable jupyter_server_nbmodel
pip uninstall jupyter_server_nbmodelIn development mode, you will also need to remove the symlink created by jupyter labextension develop
command. To find its location, you can run jupyter labextension list to figure out where the labextensions
folder is located. Then you can remove the symlink named jupyter-server-nbmodel within that folder.
This extension is using Pytest for Python code testing.
Install test dependencies (needed only once):
pip install -e ".[test]"
# Each time you install the Python package, you need to restore the front-end extension link
jupyter labextension develop . --overwrite
To execute them, run:
pytestThis extension is using Jest for JavaScript code testing.
To execute them, execute:
jlpm
jlpm testThis extension uses Playwright for the integration tests (aka user level tests). More precisely, the JupyterLab helper Galata is used to handle testing the extension in JupyterLab.
More information are provided within the ui-tests README.
# Terminal 1.
# You can also invoke `make jupyter-server`
jupyter server --port 8888 --autoreload --ServerApp.disable_check_xsrf=True --IdentityProvider.token= --ServerApp.port_retries=0
# Terminal 2.
KERNEL=$(curl -X POST http://localhost:8888/api/kernels)
echo $KERNEL
KERNEL_ID=$(echo $KERNEL | jq --raw-output '.id')
echo $KERNEL_ID
RESPONSE=$(curl --include http://localhost:8888/api/kernels/$KERNEL_ID/execute -d "{ \"code\": \"print('1+1')\" }")
echo $RESPONSE
RESULT_PATH=$(echo $RESPONSE | grep -oP 'Location:\s*\K[^ ]+' | tr -d '\r\n')
echo $RESULT_PATH
URL="http://localhost:8888${RESULT_PATH}"
echo $URL
curl "$URL"
# {"status": "ok", "execution_count": 1, "outputs": "[{\"output_type\": \"stream\", \"name\": \"stdout\", \"text\": \"1+1\\n\"}]"}Install dependencies:
pip install -e ".[test]"To run the python tests, use:
pytest

# To test a specific file
pytest jupyter_server_nbmodel/tests/test_handlers.py

# To run a specific test
pytest jupyter_server_nbmodel/tests/test_handlers.py -k "test_post_execute"pip uninstall jupyter_server_nbmodelSee RELEASE